1. Basics
We will first start by creating a simple home page containing only a page title. Then we will add the current date and time to this page to show how dynamic elements are handled in Wicket. Next, we will create a second page also containing only a page title. This second page will be populated with the list of movies in later chapters. Finally, we will provide a link from the home page to the movie list page. In the end, the home page will look like as shown in Screenshot: Home page containing a title and a link to the movie list page..
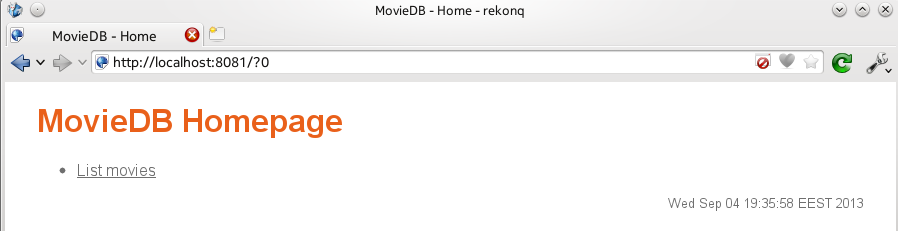
Screenshot: Home page containing a title and a link to the movie list page.
1.1. Project Files
A project that uses the Wicket framework consists of source code (in Java), web page templates (in HTML), style sheets (in CSS) and configuration files (in XML). Other than the project files themselves, we also need a web server environment in which to execute our application. Setting up a correctly configured project can prove to be a difficult task, especially for a beginner. Therefore, we will use the following files prepared specifically for this tutorial.
https://dl.dropboxusercontent.com/u/61579540/quickstart.zip
This archive contains the files needed for a very basic Wicket application. Extract it anywhere on your computer.
https://dl.dropboxusercontent.com/u/61579540/wicket.zip
This archive contains the Wicket libraries on which our application code depends. Extract it under the folder where you extracted the quickstart.zip file.
https://dl.dropboxusercontent.com/u/61579540/slf4j.zip
This archive contains the logging libraries needed by Wicket. Extract it to the same folder as the wicket.zip archive.
https://dl.dropboxusercontent.com/u/61579540/jetty.zip
This archive contains the web server which will provide us with the environment that can run our application. Extract it to the same folder as the wicket.zip archive.
The resulting folder hierarchy should look like this:
wicket-quickstart
|- src
|  |- resources
|  |- webapp
|  |- wicket
|- lib
|  |- wicket-*.jar
|  |- slf4j-*.jar
|  |- jetty-*.jar
Note
If you are using Eclipse, you can import the project from the wicket-quickstart directory.
Most of the files that we are going to work on are in the src folder. Since the Java classes in the quickstart archive are in the Java package wicket.quickstart package, they are kept in the src/wicket/quickstart folder. The HTML web page templates are also in that folder. Static files like style sheets and logos are placed into the src/webapp folder. Finally, configuration files reside in the src/webapp/WEB-INF folder.
The starting point for a Wicket application is the application class. In our example, this is the WicketApplication class. Change the contents of the file src/wicket/quickstart/WicketApplication.java as given in Listing: Initial application class. Note that, this class extends the WebApplication class from the Wicket framework (line 6) and defines a getHomePage() method (line 8) for specifying what the initial page of the application will be. In our example, the initial page will be an instance of the HomePage class (line 9).
| Listing: | Initial application class. |
|---|
1 2 3 4 5 6 7 8 9 10 11 12 13 14 15 16 | package wicket.quickstart;
import org.apache.wicket.markup.html.WebPage;
import org.apache.wicket.protocol.http.WebApplication;
public class WicketApplication extends WebApplication {
@Override
public Class<? extends WebPage> getHomePage() {
return HomePage.class;
}
@Override
public void init() {
super.init();
}
}
|
Any extra initialization for the application should be handled in the init() method of the application class (lines 13-15). For now, we don’t have anything to do at this step.
In Wicket, we have to write two files for every page in the application: one is an HTML file that contains the template of the page, and the other is a Java source file containing the components that control the dynamic elements in the template. The name of the class (and therefore the base name of the Java source file) has to be the same as the base name of the HTML template file, as in SearchPage.java and SearchPage.html. Since our application class refers to a HomePage class as the initial page for the application, we need to implement that class. Change the contents of the files src/wicket/application/HomePage.html and src/wicket/application/HomePage.java as given in Listing: Initial home page template and Listing: Initial home page class. Page classes extend the WebPage class of the Wicket framework and establish the relations with the HTML template in their constructors. Since there is no dynamic element in the home page template at the moment, there is also nothing to do in the constructor of the HomePage class (lines 6-7).
| Listing: | Initial home page template. |
|---|
1 2 3 4 5 6 7 8 9 10 11 | <!DOCTYPE html>
<html xmlns:wicket="http://wicket.apache.org">
<head>
<meta charset="utf-8" />
<title>MovieDB - Home</title>
<link rel="stylesheet" href="style.css" />
</head>
<body>
<h1>MovieDB Homepage</h1>
</body>
</html>
|
| Listing: | Initial home page class. |
|---|
1 2 3 4 5 6 7 8 | package wicket.quickstart;
import org.apache.wicket.markup.html.WebPage;
public class HomePage extends WebPage {
public HomePage() {
}
}
|
Let us also apply a style sheet to our page. Change the contents of the file src/webapp/style.css as given in Listing: Initial style sheet.
| Listing: | Initial style sheet. |
|---|
1 2 3 4 5 6 7 8 9 10 11 12 13 14 15 16 | body {
background-color: white;
color: #6F6F6F;
font-family: 'Droid Sans', 'Helvetica', 'sans';
font-size: 12pt;
margin: 2ex 2em;
}
h1, h2, h3, h4 {
color: #E9601A;
}
a {
color: #6F6F6F;
text-decoration: underline;
}
|
The last issue to discuss is how to run the application. The application can be deployed to various runtime environments, but for the sake of simplicity, we are going to run the src/wicket/quickstart/Start.java file as a regular Java application. This file is not directly a part of the project, so we will not go over its source code. When you run the application, you should see the following message in the console:
[main] INFO org.eclipse.jetty.server.AbstractConnector - Started SocketConnector@0.0.0.0:8081
In your browser, visit the address http://localhost:8081/ and you should see the text “MovieDB Homepage”. You can stop the application by pressing the Enter key in the console.
Note
You can see this initial version of the project at the address: https://pikacode.com/uyar/wicket-application-development/files/a91f1ccf55cd. You can get a copy of this version by clicking on the download link on that page.
1.2. Dynamic Content
Let us add the current date and time to the home page. We first change the HomePage.html file as in Listing: Home page template showing the current date and time. Note that, the difference is the added a footer section (lines 11-15).
| Listing: | Home page template showing the current date and time. |
|---|
1 2 3 4 5 6 7 8 9 10 11 12 13 14 15 16 17 | <!DOCTYPE html>
<html xmlns:wicket="http://wicket.apache.org">
<head>
<meta charset="utf-8" />
<title>MovieDB - Home</title>
<link rel="stylesheet" href="style.css" />
</head>
<body>
<h1>MovieDB Homepage</h1>
<footer>
<div id="datetime" wicket:id="datetime">
Wed Sep 4 15:32:40 EEST 2013
</div>
</footer>
</body>
</html>
|
The lines 12-14 contain the markup that will display the date and time. The wicket:id attribute indicates that the contents of this div element are dynamic. Therefore, the date and time on line 13 is just a placeholder to be replaced by the data provided by a Wicket component at runtime.
For every dynamic element in the template, there has to be a corresponding component in the Java class (see Listing: Home page class providing the current date and time). The template element and the component are matched using their Wicket id attributes. In our example, this means that the HomePage class must contain a Wicket component with the Wicket id datetime. We have to choose a suitable Wicket component that can supply the requested data. In this case, since the data is a simple string, we can use the Wicket Label component. Line 11 shows how to instantiate a label: the first parameter is the Wicket id, and the second parameter is the string content of the label. When this component is added to the page (line 12), the connection between the template element and the label component will be established.
| Listing: | Home page class providing the current date and time. |
|---|
1 2 3 4 5 6 7 8 9 10 11 12 13 14 | package wicket.quickstart;
import java.util.Date;
import org.apache.wicket.markup.html.WebPage;
import org.apache.wicket.markup.html.basic.Label;
public class HomePage extends WebPage {
public HomePage() {
Date now = new Date();
Label dateTimeLabel = new Label("datetime", now.toString());
this.add(dateTimeLabel);
}
}
|
Finally, we would like control how the date and time will be displayed, so we add the lines given in Listing: Stylesheet for date and time to the style.css file.
| Listing: | Style rules for date and time. |
|---|
div#datetime {
  font-size: 80%;
  text-align: right;
}
The application, as implemented so far, will run as follows:
- A WicketApplication object will be instantiated. This object will set the HomePage class as the entry page of the application.
- A HomePage object will be instantiated. This, in turn, will instantiate a Label object with the Wicket id datetime and set the current date and time as its contents. This label will be added to the page.
- The HomePage.html template will be used to display the page. All elements without a Wicket id will be displayed as they are. The contents of the div element with the Wicket id datetime will be replaced by the content of the label component with the same id in the HomePage object.
Adding a component to another component creates a hierarchy between the two. For example, when we added the label component to the page component, it made the label a subcomponent of the page. The HTML template also has a hierarchy due to the nesting of the HTML tags. Wicket matches the hierarchy of the HTML template to the hierarchy of the Java components. For example, consider the template below where a span element is nested inside a div element:
<body>
  <div wicket:id="x">
    some text
    <span wicket:id="y">some other text</span>
  </div>
</body>
The corresponding Java page component could contain code like given below. Note that the componentX (Wicket id x) is added to this (the page component), whereas componentY (Wicket id y) is added to componentX:
SomeComponent componentX = new SomeComponent("x");
this.add(componentX);
SomeOtherComponent componentY = new SomeOtherComponent("y");
componentX.add(componentY);
The parent component of any component can be retrieved using its getParent() method. Continuing with the example above, the following code will assign componentX to parent:
SomeComponent parent = (SomeComponent) componentY.getParent();
Note
You can see the changes from the previous version at the address: https://pikacode.com/uyar/wicket-application-development/commit/05a5a934c6ae. You can get a copy of this version by clicking on the download link on that page.
1.3. Adding Links
Now we want to create a second page which will be responsible for listing the movies in the collection. At first, the page will only contain some static text, it will be populated in later chapters. Create an HTML file with the name MovieListPage.html, and a Java file with the name MovieListPage.java. Arrange the HTML file as given in Listing: Initial movie list page template. Again, since there is no dynamic element in this template, the constructor of the MovieListPage class is empty (see Listing: Initial movie list page class).
| Listing: | Initial movie list page template. |
|---|
1 2 3 4 5 6 7 8 9 10 11 | <!DOCTYPE html>
<html xmlns:wicket="http://wicket.apache.org">
<head>
<meta charset="utf-8" />
<title>MovieDB - Movie List</title>
<link rel="stylesheet" href="style.css" />
</head>
<body>
<h2>Movie List</h2>
</body>
</html>
|
| Listing: | Initial movie list page class. |
|---|
1 2 3 4 5 6 7 8 | package wicket.quickstart;
import org.apache.wicket.markup.html.WebPage;
public class MovieListPage extends WebPage {
public MovieListPage() {
}
}
|
Our next step will be to provide a link from the home page to the movie list page. In order to achieve this, we modify the HomePage.html as in Listing: Home page template with link to movie list page. The code for adding the link is on line 12. This line states that the necessary information for the a element will be supplied by a component with the Wicket id list_movies in the HomePage class. As before, the href attribute of the a element is just a placeholder and will be replaced by the value supplied by the Wicket component.
| Listing: | Home page template with link to movie list page. |
|---|
1 2 3 4 5 6 7 8 9 10 11 12 13 14 15 16 17 18 19 20 21 | <!DOCTYPE html>
<html xmlns:wicket="http://wicket.apache.org">
<head>
<meta charset="utf-8" />
<title>MovieDB - Home</title>
<link rel="stylesheet" href="style.css" />
</head>
<body>
<h1>MovieDB Homepage</h1>
<ul>
<li><a href="#" wicket:id="list_movies">List movies</a></li>
</ul>
<footer>
<div id="datetime" wicket:id="datetime">
Wed Sep 4 15:32:40 EEST 2013
</div>
</footer>
</body>
</html>
|
The Wicket framework provides an abstract Link class which can be extended to create a new link class. For the new class, we have to implement a constructor and override the onClick() method that specifies what will happen when the link is clicked. Create a Java file named MovieListPageLink.java and arrange it as in Listing: Movie list page link class. Note that, since this is not a Wicket page, there is no template associated with it.
Constructor methods of Wicket component classes take an id value as their first parameter (their Wicket id). Since there is nothing special to do, the constructor will just invoke the constructor of its superclass with the same parameter (line 7). The onClick() method creates a new instance of a movie list page (line 12) and calls the setResponsePage() method to direct the user to this newly created page (line 13).
| Listing: | Movie list page link class. |
|---|
1 2 3 4 5 6 7 8 9 10 11 12 13 14 15 | package wicket.quickstart;
import org.apache.wicket.markup.html.link.Link;
public class MovieListPageLink extends Link {
public MovieListPageLink(String id) {
super(id);
}
@Override
public void onClick() {
MovieListPage targetPage = new MovieListPage();
this.setResponsePage(targetPage);
}
}
|
The final step is to add an instance of this link to the constructor of the HomePage class (lines 2-3 in Listing: Home page class constructor with link component to movie list page):
| Listing: | Home page class constructor with link component to movie list page. |
|---|
1 2 3 4 5 6 7 8 | public HomePage() {
MovieListPageLink movieListPageLink = new MovieListPageLink("list_movies");
this.add(movieListPageLink);
Date now = new Date();
Label dateTimeLabel = new Label("datetime", now.toString());
this.add(dateTimeLabel);
}
|
Note
You can see the changes from the previous version at the address: https://pikacode.com/uyar/wicket-application-development/commit/10a4f316e0b3. You can get a copy of this version by clicking on the download link on that page.
1.4. Shorter Code
There are a few things we can do to make the code shorter and more readable. First of all, we do not have to assign the result of every intermediate step to a variable. For example, when adding the date and time to the home page, we can skip the assignment of the label to a variable and send the label directly as parameter to the add() method. That means, we can change the lines 5-7 of the HomePage class constructor in Listing: Home page class constructor with link component to movie list page to:
Date now = new Date();
this.add(new Label("datetime", now.toString()));
Similarly, we can change the onClick() method of the MovieListPageLink class to:
public void onClick() {
    this.setResponsePage(new MovieListPage());
}
When the project gets larger, it becomes impractical to create Java files for every custom Wicket component we need. For example, we have to extend the Link class to create a link component for every link with a different target. Instead, we can use anonymous classes to reduce the number of files in our project and make it easier to manage. In Listing: Home page class constructor using shorter code, we extend the Wicket Link class where we instantiate a link to the movie list page (lines 2-7) and therefore we do not need a MovieListPageLink class anymore.
| Listing: | Home page class constructor using shorter code. |
|---|
1 2 3 4 5 6 7 8 9 10 11 12 | public HomePage() {
Link movieListPageLink = new Link("list_movies") {
@Override
public void onClick() {
this.setResponsePage(new MovieListPage());
}
};
this.add(movieListPageLink);
Date now = new Date();
this.add(new Label("datetime", now.toString()));
}
|
Note
You can see the changes from the previous version at the address: https://pikacode.com/uyar/wicket-application-development/commit/569ed45fc7b3. You can get a copy of this version by clicking on the download link on that page.